|
| Clip-on suspenders |
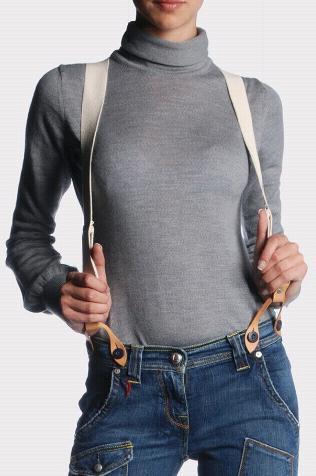
Suspenders can be connected to your pants or skirt in two main ways: with clips or buttons. There’s also a few more, which I’ll briefly mention, but these are the two primary methods.
Clip-on suspenders have sharp teeth that grip the pant material. They are sometimes called alligator clips. The clip grips the waistband of the pant, which can cause the material to be damaged over time. Clip-ons provide a quick, easy method to attach suspenders to your pants or skirt. Each shoulder strap has 1 clip that snaps to the front of your pants on each side of the hips, and 1 or 2 clips (depending on if it’s a Y or X style) that clip to the back. They come in wide variety of colors, can be thin or wide, and add a fresh spice to a dull wardrobe. Because they are so easy to attach, they are generally used by novice suspender-wearers.
Wearing clip-ons with a formal suit or skirt not only looks tacky and cheap - like wearing a clip-on tie - but also damages the materials from the pull of the sharp teeth. No well-dressed individual would use clip-ons when wearing a formal outfit.
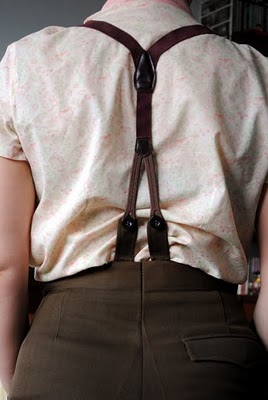
Button-on braces
 |
| Button-on braces |
The better option is to use buttons to attach the suspender straps to your pants or skirt. Button tabs use leather or cloth "ends" that attach to the strap. Button-on braces are more comfortable, traditional and formal than clip-on suspenders. Where clip-ons have 1 point of contact with the pants, button-ons have 2. There are 2 buttons at each end of the suspender straps - 2 on each side in the front, and 2 buttons in the back for a total of 6 buttons -
double protection! This results in
6 “connection points” to the pants, compared to a minimum of 3 connections with Y-style clip-on suspenders – double the connections!
More connection points means your pants stay in place and the straps will not move as much. Your pants will still stay up even if you pop a button. With suspenders, if a clip pops off, the strap is left hanging loose and not doing its purpose.
There’s also braces that have 8 connection points – 4 in the front, and 4 in the back, which can be very comfortable.
Connection points are the key consideration. If you just want to follow the latest trend, you can use clip-on suspenders. But if you actually want comfort and to hold up your pants, you should use button-on braces. Case in point, in the photo below, the man is wearing suspenders when he should be wearing braces. The suspenders are not adequately supporting the waistband of his pants - its drooping in the center and around the rear. The gentleman should be wearing button-on braces to properly support his wider waist. This will allow 4 connection points in front, rather than the current 2.
 |
| More connection points (with braces) would better support these pants |
Many opponents to braces state that
buttons pop off easily.
After wearing braces for many years I have simply not found this to be
the case. There's a principle in engineering to have low-cost, easily
replaceable part act as an intermediary before an expensive component
(such as a motor). The purpose is for the low-cost part to fail (either
from wear and tare or excess use) and in the process save the expensive
component from failure.
This same principle applies to
button braces. The button and thread are low-cost parts that are easily
replaceable. The brace tabs are more expensive and costly to repair if
torn. As such, with sufficient wear and tare or excess pressure, the
low-cost parts (the button and thread) should "fail" (pop off) in order
to preserve the brace tab. In the alternative, the button and thread
hold fast to the pants and the brace tab tears, leaving the wearer in a
worse condition. The brace wearer can't simply loop the tab to another
button but has a dangling tab to deal with for the rest of the day. I've
fortunately never been in this situation, but have seen others and it's
not fun.
All this to say, there's solid engineering principles behind having your button popping off in order to save the brace tab from damage.
As you’ve probably noticed, I generally use
suspenders to refer to
clip-on suspenders, and
braces to refer to the
button-on variety.
I recommend
button-on braces any and every day over clip-on suspenders. But you do get marks for wearing suspenders!
The primary disadvantage of
clip-on suspenders is that they always snap off at an inconvenient time, or
need constant adjusting...
 |
| This lady has not even noticed that her suspender clip has snapped off |
 |
| Constant adjusting and reconnecting is common for suspenders |
 |
Suspenders easily attach to any pair of pants, like this boys
|
Alternative connections include:
-
bachelor buttons provide a permanent connection with a metal rivet and suitable for denim. These are useful when
doing heavy labour, but may not be stylish.
- single connection strap – These are simple and basic, but do not provide sufficient support for the pants. This is because there are fewer connection points which will result in sagging.
Or this single-button style that uses braces to attach to a single button:
-
Clip on, button-style connections –
like these. These are the middle ground connections that try to be too much. They are handy for snapping on your pants, but are not suitable for formal wear, where buttons show the more polished image.
-
Straps sewn directly into the pants or skirt. These are stylish, but don’t allow for movement and stretch during the day. As a result, they are more prone to ripping and tearing which is harder to repair than sewing on a button.
-
Steel attachments: An
inventor used steel to reinforce the connection between the waistline and brace tab. A strip of steel is presewn into the waistline at the locations where the brace loops are to connect to the waistline. The patented flat, steel spring is then used to attach the brace tabs to the steel strip.
In it's normal position, the spring is loaded (right diagram). It expands across the steel strip and anchors the brace tab to the waistline. When the spring is squeezed together (left diagram) the spring can be detached from the steel strip in the waistline, detaching the brace tabs in a similar way as unbuttoning braces.
Discussion time:
- What type of connection do you prefer?
- Do you buy pants/skirts and then find braces to wear with them, or buy braces and then find pants/skirt to wear with it?
Note: all photos are used solely for non-commercial use and to illustrate braces in fashion. No plagiarism is intended.