Showing posts with label button-on braces. Show all posts

Sunday, June 30, 2019

Suspender connections: Inverse-V compared to Inverse-U

After deciding whether to connect the straps to the waistline using clip-ons or buttons, the
next question is the style of connections for buttons. Button-on braces have 2 distinct styles: inverse-V and inverse-U tabs (or connections). 
Various brace connections (from left to right): inverse-V, cord, and inverse-U tabs


As implied by the name, an inverse-V tab has two small tabs, or strips of leather, that fan out from the shoulder strap and attach to the buttons on the waistline (left braces on the photo above). An inverse-U tab also has two tabs that attach to the two waistline buttons, but has a single leather strap that loops onto itself from one button to the other, centering on the shoulder strap (right braces on the photo above). Depending on the tension on the braces, it can resemble an inverse-V shape, but is more oval.
Comfortable and relaxed, the inverse-U tabs keep everything aligned

Both styles have their advantages and disadvantages. Inverse-V tabs are the traditional choice and were the first to appear in history. They offer a rigid anchor from the shoulder strap to the waistline. For example, leaning forward results in tension in the shoulder strap, pulling the inverse-V tab, putting pressure on the side brace button, and pulling the side of the waistline in the same direction. Inverse-V tabs are perfect for keeping the waistline at a constant height, especially the side of the pant waistline.

Historically, supporting the front (center seam) and side seam of the pants was important. In fact, for the front brace tabs, the traditional inverse-V tabs have the brace tabs closest to the center about half an inch longer in length compared to the tabs on the side (see photo below). This is to accommodate more portly men and to position the shoulder strap further to the side then straight down the middle of the chest. Look for this when you are considering purchasing inverse-V tab braces, as a way to discern if the braces are a true vintage piece (or replica). This style of tabs was very common in the 1930s and 40s.

Inverse-V tabs. Notice the center brace tabs are slightly longer
than the side brace tabs

Inverse-U tabs are somewhat more modern. They allow the shoulder strap to glide along the inverted U arch, in unison with the body’s movement. This provides more freedom and superior comfort. For example, leaning forward results in the shoulder strap sliding forward to the center button; leaning backwards, the strap slides backwards. At the rear, when you wear Y-back braces, when you lean left, the tab will shift to the left; when you lean right, the tab will shift to the right. Everything in line, everything comfortable.

To illustrate further, below is a photo of Robert Shaw playing Doyle Lonnegan in The Sting, 1973. He is wearing inverse-U tab braces, which I've highlighted in red. To show the difference, I've over-layed what an inverse-V tab brace would look like for comparison. In this still capture, as he bends down, the change in the shoulder straps position shifts. Notice how his strap on the inverse-U tab (red outline) shifts towards the inner center button, accommodating his body movement. This is in contrast to if he was wearing inverse-V tabs (the blue outline). The inverse-V tab would have stayed rigid and put strain on the outer side button, pulling up that area. Either way, his waistline stays well supported.

Doyle Lonnegan from The Sting, 1973

As you can likely see by now, inverse-U tabs result in less strain on the brace buttons compared to inverse-V tabs. This is because the inverse-U style allow the tension to be shifted as it glides along the arch, and minimizes tension over the two brace buttons rather than being locked into one position. This is likely the reason this style has become a predominant style for button braces, and my theory is that it results in less buttons popping off. This concept was fully used by President Suspenders in gliding and shifting to the body’s position.
Ad for President Suspenders showing the conforming nature to every movement

Further to this point, lumberjacks need braces to keep their jeans up during their strenuous manual labour. The most common style of braces for lumberjacks is X-back braces with inverse-U connections at the front. This provides solid support at the rear and flexibility for movement at the front. There are also inverse-V tabs at the front, but I generally see inverse-U tabs.
 

All this to say, I do still see a fair share of inverse-V connections and like them as well. 

Drawbacks

What are the drawbacks of each? For inverse-U tabs, if one of the buttons pops off (which is rare), the shoulder strap pulls to the end of the half circle and becomes slack. This would not have as large an impact for inverse-V tabs. If a button pops off, the tension in the shoulder strap remains relatively strong because the remaining brace tab is not dependent on the other brace tab to function. The released brace tab now flaps around, making its presence known. The inverse-U tab is dependent on both buttons staying anchored, whereas the inverse-V connection is not.

For inverse-V tabs there is more tension on the brace buttons, as it cannot glide. This is generally the case on the side brace buttons, which experiences more strain as people bend forward throughout the day. Case in point, this happened to this lady in the photo below:
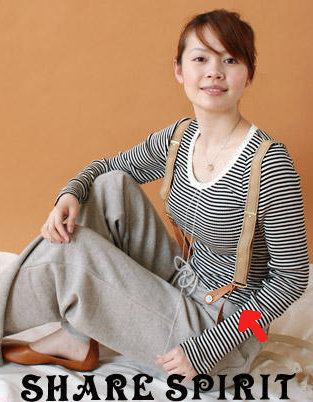
Note the popped button and loose brace strap

When braces were very popular, most men chose inverse-U tabs. This is likely because of the comfort and flexibility they offered. If a button happened to pop off, you simply looped the dangling tab to the remaining anchor.


What should you wear: inverse-U or inverse-V tabs? Ultimately it’s a decision on whether you prefer a more rigid anchors or prefer to have your shoulder straps glide along and shift with your movements.


Personally, I have both inverse-V and inverse-U tabs and enjoy both. But if you ask me when do I forget that I’m wearing braces because they conform to my movement, it’s when I’m wearing inverse-U tabs. They accommodate the body’s movements so effortlessly!


Discussion:

  • Which style do you prefer: inverse-V or inverse-U tabs? Why?
  • Have you noticed how inverse-U tabs glide to align with your movement?

Wednesday, September 20, 2017

Return of the Light Blue Pants

When I was a boy my parents bought me a pair of light blue dress pants. This was unlike any pair of pants I'd worn before, as the pants came with suspenders in the same color. The pants were high-rise, which was the trend at the time, and these pants came up just above my belly button. The pants had no waistband, rather the fabric came up all the way and just stopped. I’ve since learned this style is called ‘Hollywood Waist’. As a thin boy, the pants required the use of suspenders to hold them up, which is likely why they were included. The suspenders were Y-back and clipped-on to the hollywood waist. It made sense why there was no waistband - the pants were intended to be worn only with suspenders.

I remember wearing this outfit often - to holiday dinners, church, and weddings, especially in the summer time. I’d wear a checkered shirt or for more formal occasions, a white dress shirt. There was no suit jacket – just the pants and suspenders. I felt stylish in my pants and suspenders.

I remember other boys wore pants and suspenders as well. It was quite common back then.

Jump ahead 20 years, while hunting through a thrift store I came across a strikingly similar pair of light blue dress pants. This time in an adult size and without suspenders. When I saw them, my childhood memories of wearing the blue pants immediately came rushing to mind.

I was so surprised! I must have been staring at the pants too long, as the lady working in that department came by to ask how I was doing. I told her I used to wear a pair of pants similar to this when I was young and it was bringing back memories. She smiled and suggested I purchase them to relive my childhood. 

I agreed and shared my memories of wearing high-rise pants as a child with suspenders. She replied that she loved the look and that I should do the same with this pair. But, I said, this time I would wear the pants with button-on braces, instead of clip-on suspenders.

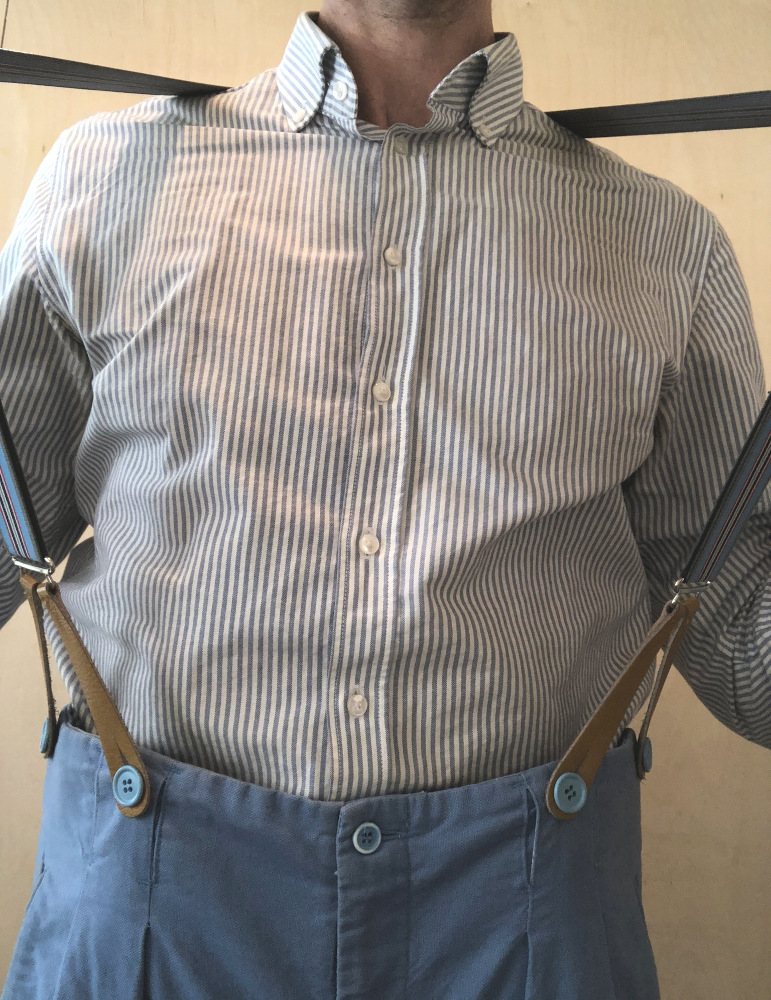
A few days later I removed the belt loops and sewed suspender buttons on the waistline. I sewed the buttons on the outside of the waistband to fit the vintage style of the pants. Buttons on the outside is very traditional, and I wanted to show the details of the suspender buttons against the brace tabs. Here’s a close-up of the brace tabs and exterior suspender buttons.

Here's another close-up with a different shirt:

Exterior suspender buttons against the brown brace tabs

The diamond pattern in the shirt complement the diamond braces.

Rear shot of braces

I love the look and feel of the pants; they are vintage and make a statement! It's the closest thing I can get to reliving my childhood!

Later this year I found another pair of light blue, high-waisted denim pants at a thrift store. They had a vintage design at the waist - no belt loops. Rather the pant fabric came up to top of the pants. These were again the Hollywood waist. They again reminded me of my childhood and wearing suspenders. These pants required suspenders to hold them up, but did not come with buttons, so I sewed them on, this time on the inside of the waistband.

High-waisted, light blue denim pants with braces

Rear shot of high-waisted pants

I bought these stripped Y-back braces long before I had light blue pants. They pair so well and I like the colors - the blue on the braces with the blue in the pants, and the red on the braces with the red in the dress shirt, the white on the braces and the white on the dress shirt. 


A few years later, after enough people had wanted to see the buttons attach at the waist, I decided that these pants would be better with the buttons on the outside of the pants. So I clipped them off and resewed the buttons onto the exterior of the waistline. 

Buttons on the outside

Rear shot of buttons on the outside

I like that people can see my buttons and braces. It's a vintage look that I enjoy and know others do as well.

These pants are larger at the waist, as you can see with the slight fish-tail back feature. Just like the pair of pants I had when I was young, these pants need braces to hold them up.

Evidence that my braces are suspending my loose waistline

Now when I wear either of these blue pants I'm reminded of my childhood, and where my love of high-waisted pants and suspenders all started.


Discussion time:

  • Did you wear suspenders growing up?
  • Do you continue to wear suspenders, or stopped after childhood?

Wednesday, September 15, 2010

History of Braces

Where did braces come from? According to Alan Flusser’s, “From the time man first chose to wear trousers, either leather belts, rope, or cloth sashes were used to hold them up. It wasn't until the time of the French Revolution, however, when short vests and trousers reaching to the armpits were worn, that the suspender first appeared. These early examples were merely straps of leather that fell directly over the shoulders and were fastened to the waistband of the trousers by means of a hook.


Within a short time, suspenders, which were originally quite heavy and rather uncomfortable, became the favored choice of nobility and were eventually considered the mark of any well- dressed gentleman. In fact, no properly attired Victorian man would have dared consider himself affianced to any young woman of breeding until she had presented him with a pair of suspenders embroidered by her own dainty hands.


In this country, suspenders were also considered the only choice of the well-dressed man, but by the end of the nineteenth century, this thinking began to undergo a slow yet inexorable change. This change was due, at least in part, to the uniforms men wore during the various wars that flared up during the late nineteenth century. Belts became more popular as shoulders were emphasized and waists pulled in, simply in an effort to appear more threatening and imposing.


By the early 1900s, folded belts were all the rage. They were fashioned by joining two-inch strips of cowhide, then stitching the edges to produce a rounded, pliable belt one inch in width. Also popular during this period was the Sam Browne officer's belt, which appealed not only to veterans but to other men as well.


But it was probably S. Rae Hickock, a successful dealer in leather goods, who did more than anyone to ensure the success of the belt industry when he began to manufacture belt buckles with etched monograms around 1910.


By the time American men returned home from world War I, they were wearing coarse yarn belts, which quickly caught the fancy of the general male populace. However, during the summer, when vests and jackets came off, belts went on as men chose not to expose their suspenders. Also during this period knickers became popular, further limiting the use of suspenders. And although suspenders maintained their popularity well into the decade of the 1920s, by the time the stock market fell, most men's trousers were being held up by belts.


Though they have recently experienced a renaissance of sorts, today suspenders are but a small part of the haberdashery industry. Belts, on the other hand, come in many colors, widths, and all sorts of materials, ranging from leather to fabric to plastic.” (“Dressing the Man”, 2002).


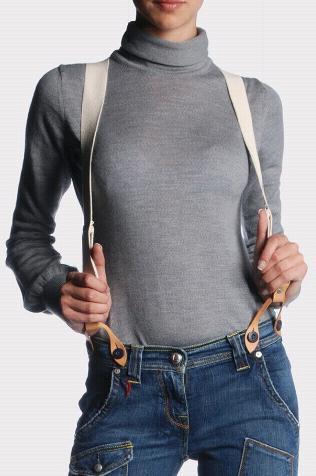
Women have been wearing braces for as long as men have, because they work and are stylish!


As you can see, belts have taken over for suspenders, not because they are functionally superior, but because it was considered a source of embarrassment to display suspenders. Considering that we now live in the 21st Century, this embarrassment has slowly dissipated, and now, in 2010, suspenders are not being hidden underneath vests and suit jackets, but being proudly displayed. The range of colors, fabrics, and designs has increased significantly.

Discussion time:
  • How long have you been wearing braces for?
  • Do you wear braces proudly or with embarrassment?
Note: all photos are used solely for non-commercial use and to illustrate braces in fashion. No plagiarism is intended.

Saturday, September 4, 2010

Suspender Connections: Clip-ons versus buttons

Clip-on suspenders
Suspenders can be connected to your pants or skirt in two main ways: with clips or buttons. There’s also a few more, which I’ll briefly mention, but these are the two primary methods.

Clip-on suspenders have sharp teeth that grip the pant material. They are sometimes called alligator clips. The clip grips the waistband of the pant, which can cause the material to be damaged over time. Clip-ons provide a quick, easy method to attach suspenders to your pants or skirt. Each shoulder strap has 1 clip that snaps to the front of your pants on each side of the hips, and 1 or 2 clips (depending on if it’s a Y or X style) that clip to the back. They come in wide variety of colors, can be thin or wide, and add a fresh spice to a dull wardrobe. Because they are so easy to attach, they are generally used by novice suspender-wearers.

Wearing clip-ons with a formal suit or skirt not only looks tacky and cheap - like wearing a clip-on tie - but also damages the materials from the pull of the sharp teeth. No well-dressed individual would use clip-ons when wearing a formal outfit.

Button-on braces
Button-on braces
The better option is to use buttons to attach the suspender straps to your pants or skirt. Button tabs use leather or cloth "ends" that attach to the strap. Button-on braces are more comfortable, traditional and formal than clip-on suspenders. Where clip-ons have 1 point of contact with the pants, button-ons have 2. There are 2 buttons at each end of the suspender straps - 2 on each side in the front, and 2 buttons in the back for a total of 6 buttons - double protection! This results in 6 “connection points” to the pants, compared to a minimum of 3 connections with Y-style clip-on suspenders – double the connections! More connection points means your pants stay in place and the straps will not move as much. Your pants will still stay up even if you pop a button. With suspenders, if a clip pops off, the strap is left hanging loose and not doing its purpose.

There’s also braces that have 8 connection points – 4 in the front, and 4 in the back, which can be very comfortable.


Connection points are the key consideration. If you just want to follow the latest trend, you can use clip-on suspenders. But if you actually want comfort and to hold up your pants, you should use button-on braces. Case in point, in the photo below, the man is wearing suspenders when he should be wearing braces. The suspenders are not adequately supporting the waistband of his pants - its drooping in the center and around the rear. The gentleman should be wearing button-on braces to properly support his wider waist. This will allow 4 connection points in front, rather than the current 2.
More connection points (with braces) would better support these pants

Many opponents to braces state that buttons pop off easily. After wearing braces for many years I have simply not found this to be the case. There's a principle in engineering to have low-cost, easily replaceable part act as an intermediary before an expensive component (such as a motor). The purpose is for the low-cost part to fail (either from wear and tare or excess use) and in the process save the expensive component from failure.

This same principle applies to button braces. The button and thread are low-cost parts that are easily replaceable. The brace tabs are more expensive and costly to repair if torn. As such, with sufficient wear and tare or excess pressure, the low-cost parts (the button and thread) should "fail" (pop off) in order to preserve the brace tab. In the alternative, the button and thread hold fast to the pants and the brace tab tears, leaving the wearer in a worse condition. The brace wearer can't simply loop the tab to another button but has a dangling tab to deal with for the rest of the day. I've fortunately never been in this situation, but have seen others and it's not fun.

All this to say, there's solid engineering principles behind having your button popping off in order to save the brace tab from damage.

As you’ve probably noticed, I generally use suspenders to refer to clip-on suspenders, and braces to refer to the button-on variety.

I recommend button-on braces any and every day over clip-on suspenders. But you do get marks for wearing suspenders!

The primary disadvantage of clip-on suspenders is that they always snap off at an inconvenient time, or need constant adjusting...
This lady has not even noticed that her suspender clip has snapped off
Constant adjusting and reconnecting is common for suspenders

Suspenders easily attach to any pair of pants, like this boys


Alternative connections include:
- bachelor buttons provide a permanent connection with a metal rivet and suitable for denim. These are useful when doing heavy labour, but may not be stylish.

- single connection strap – These are simple and basic, but do not provide sufficient support for the pants. This is because there are fewer connection points which will result in sagging.

Or this single-button style that uses braces to attach to a single button:

- Clip on, button-style connectionslike these. These are the middle ground connections that try to be too much. They are handy for snapping on your pants, but are not suitable for formal wear, where buttons show the more polished image.


- Straps sewn directly into the pants or skirt. These are stylish, but don’t allow for movement and stretch during the day. As a result, they are more prone to ripping and tearing which is harder to repair than sewing on a button.

- Steel attachments: An inventor used steel to reinforce the connection between the waistline and brace tab. A strip of steel is presewn into the waistline at the locations where the brace loops are to connect to the waistline. The patented flat, steel spring is then used to attach the brace tabs to the steel strip.

In it's normal position, the spring is loaded (right diagram). It expands across the steel strip and anchors the brace tab to the waistline. When the spring is squeezed together (left diagram) the spring can be detached from the steel strip in the waistline, detaching the brace tabs in a similar way as unbuttoning braces.
 

Discussion time:
  • What type of connection do you prefer?
  • Do you buy pants/skirts and then find braces to wear with them, or buy braces and then find pants/skirt to wear with it?

Note: all photos are used solely for non-commercial use and to illustrate braces in fashion. No plagiarism is intended.