Showing posts with label brace button. Show all posts

Thursday, June 27, 2019

Tales of a Brace-wearer (Part I)

A man was in his first week at a new corporate office. The corporate dress code was primarily suits but also blazers and dress pants.
One day the man was stopped by a couple of female colleagues. “Can we ask you a question?” one asked, “We’ve been talking about your style; your suits look so well put together.”
“Thank you,” said the man.
The lady continued, “Your clothes fit well, and you look comfortable in them: your shirt stays tucked in, your pants don’t drag on the ground, your pants stay at your waistline, you’re not constantly adjusting your pants like other guys around here. Your pants stay in place, but I don’t see you wearing a belt. If you don’t wear a belt, then you must be wearing … suspenders?”
Box-cloth braces
With a smile, the man flipped open his jacket to reveal a pair of royal blue braces.
“I knew it had to be suspenders!” exclaimed the second lady.
“Yes, these are the answer to why everything fits together. They are very comfortable and practical, and I don’t need to be concerned about my pants all day,” said the man.
 “What kind of suspenders are those? I have not seen suspenders with leather attachments at the waist before. How do they attach to the pants?”
“There are small buttons sewn onto the waistband of my pants. The straps are connected by these brace tabs that are either in an inverted-V or inverted-U – these are inverted-U. When suspenders attach to the pants with buttons they are generally called ‘braces’, and when they attach with alligator clips they are called ‘suspenders’. Some pants have the buttons on the outside of the waistband, some on the inside, depending on your preference.”
“I see,” said the second lady. “That’s so classy. I love the look. Buttons are more sophisticated than clips.”
“I prefer the buttons over the clips as well. In addition to being classy, when you have buttons there are more anchor points to keep my pants aligned all day long, regardless of my movements. But there’s more to it than just brace tabs attached to buttons. The buttons are positioned in specific locations along the waistline to anchor the pants, both at the front and back.” The man motioned with his hand, “let me explain: see how the buttons are aligned directly with the pleats, and on the side of the pants with the pockets?”
“Yes” agreed the women.
“The brace buttons secure the pants at the right locations – at the pleat line, to keep the line perfectly straight, and at the pockets. Think of it as an anchor here at the pleat line,” pointing to the location, “and an anchor here at the pockets. A single anchor - whether attached by a single brace tab or alligator clip - would be insufficient, regardless of where it is placed. That’s why clips simply don’t provide the same level of comfort and support for pants.”
“Now that you mention it, that makes sense. I’ve never thought about that. It’s no surprise that you look so put together – the pleats are kept straight with the brace buttons anchoring them at just the right places on the waistline,” said the first women.
 “Exactly; and the other side of the brace tabs anchor the side of the pants,” motioned the man.
“Yes, I can see how it works now,” said the lady. “How about on the back of the pants? How do the buttons anchor the pants?”
The man removed his jacket to show the rear, fish-tail back detailing.
The women breathed in, “Oh wow, these pants are designed for braces!”
“Exactly, the fabric over each leg comes to a climax at the anchoring brace buttons, which are held in line with the brace loop, which in turn is held perfectly in line with the rear brace strap. It all aligns perfectly to give a clean look at the back,” stated the man.
“Yes, I can see why your pants look so coordinated and fit so well,” said the women. “The pants are held up at all the right points to keep the pleats and pocket aligned, and at the rear over each leg.”
“That’s fantastic,” said the other lady. “The design of the pants fabric to come up to meet the braces is truly unique. It completes the look of the braces. I have never seen this before. It’s so stunning and sophisticated!”
“Thank you,” beamed the man.
 
“You don’t find pants like that off the rack in stores.”
“Agreed,” said the man.
“So where did you get them?”
“This pair I had custom-made. It’s called a ‘fish tail back’,” said the man.
“Going back to how braces attach to the pants – with buttons…” said the women.
“Yes, the buttons allow you to exchange one pair of braces with another for different looks. Sewing on buttons is an easy skill to learn,” said the man. “And it would be helpful to know, as buttons can sometimes pop off.”
The women smiled, “Ah yes, now that you mention it, I recall a black and white photo of working men with the brace tabs on one side connecting to only one point on the waistline, a button must have come off. Is that common?”
“It’s very rare for buttons to come off if they have been sewn on securely. Buttons don’t come off unless they’re under significant, prolonged pressure or the threads are worn down. I’ve been wearing braces for over 15 years and only had a few buttons pop off in that time. As the buttons are anchoring at the right locations, when one pops off you notice the change in tension and drooping pants right away. Men have been wearing braces with buttons for over 150 years, and if they didn’t withstand the daily demands of life back then, they couldn’t today.”
The man continued. “I find buttons grip far better over the long term than clips can. Aside from your buttons being anchoring points, clips snap off all the time as they only clinch the fabric, not firmly attach to it. Clips also damage the fabric, so for formal dress fabrics, clips should never be used. Braces stay firmly anchored with buttons. I like the vintage look of braces. Having been worn for over 150 years, they are timeless and classy.”
“Yes they are. I recall old photographs of men wearing braces and wondering why men don’t wear them anymore. Why aren’t more men wearing braces?”
“The height of the waistline on men’s pants is the primary reason,” the man responded. “Waistlines have inched lower and lower over time. Historically, waistlines were at or above the belly-button. This elongated the legs and made the man look taller. There is also a slight budge at the waist, so higher waisted pants pass smoothly over this budge. But in order to keep pants at this higher waist, braces must be used to support them.”
“I think another reason is that people associate suspenders with the clip-on variety and that’s a major turn off,” says the man. “Clips snap off, don’t anchor the pleat and side of the pants at the same time, and because you can easily take suspenders from one pair of pants to another, they look cheap. Braces are practical, stylish, and classy. I think more men should try braces and discover the comfort and confidence that comes with wear braces.”
“I agree,” chimed the women.
The man turned to go, but the first lady wasn’t finished. “As a stylish man, why do you leave your jacket on? Why not show off your braces and the stylish pants. I’m sure people would appreciate your style, as much as we have!”
“Thank you for the compliments on my style. Historically braces were considered an undergarment and not to be displayed. They were considered underwear and only your immediate family saw them. This thinking has changed and it’s now acceptable to display braces. But as braces are a vintage accessory, some of this traditional thinking carries on.”
“I see; but there are lots of old photographs of men showing their braces, without a jacket. I actually like seeing braces and the different styles and designs – it adds to the outfit. I love your pant style at the back, what did you call it? Fish-tail back? You don’t need to hide this special tailoring. I think you would agree with me,” turning to the other lady, “that braces can be proudly displayed.”
“Absolutely”, nodded the women.
“Thanks for the encouragement. And thanks again for the complements on my pants and braces.”
“You’re welcome.” 
The next day, the women gathered at the man’s office, eager to see his outfit for the day. He had taken off his blazer and was wearing a classy dress shirt with a pair of grey pants held in place by braces. The braces were stripped grey and navy.
“Love the braces; they complement your grey pants well,” admired the lady. “Are they fish-tail back pants today?”
The man stood up and smiled, turning around to reveal the fish-tail back details.

Friday, September 18, 2015

How to sew on Brace Buttons

Time has flown by! It's been 9 months since my last post where I described how a brace button popped off my jeans. I sewed that button on, but didn't find time to write the post. This week a different button popped off from wear and tare, so it's high time I write this post on sewing buttons for braces! As a side note, if you take these two instances, you may think that my buttons are popping off all the time. This is not the case. Aside from the popped button this week and in December, I can't remember the last time a button popped off.

 
I will mention that a button popping off is an effective method to ensure the brace tabs are not damaged when braces are under significant strain. It is better to have a popped button than to have a damaged brace tab. Brace tabs are very difficult to repair, whereas a button can be easily sewn on.

If you are currently wearing braces and a button pops off or you wish to start wearing braces, you should know how to sew on brace buttons. It is relatively simple to sew on buttons. 

This post is your step-by-step guide to sewing on a button for braces.

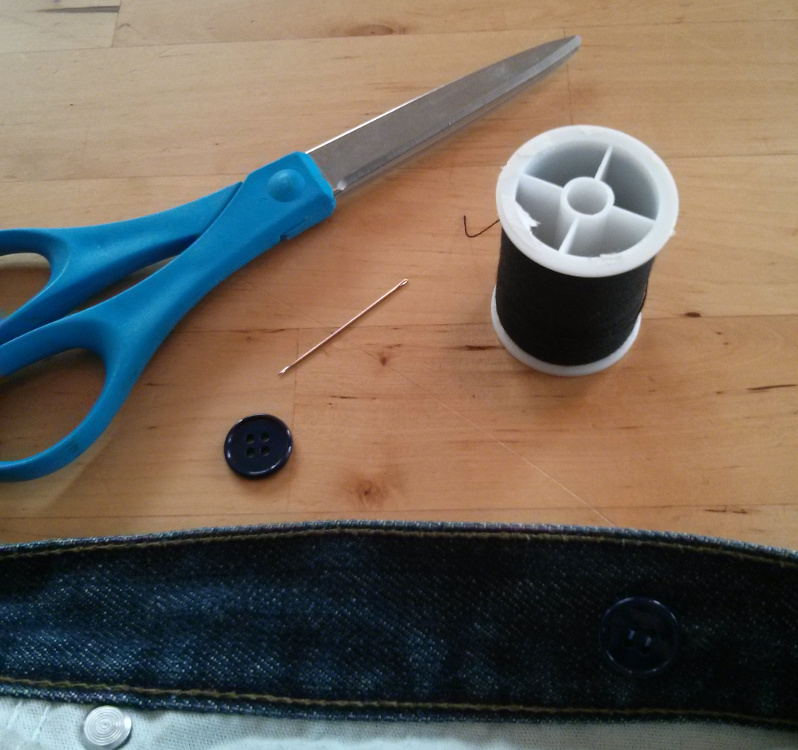
Supplies for sewing on brace buttons:

  • 6 cone-shaped buttons (2 for each brace tab)
  • Desired color of thread that matches the color of your pants or inside waistband lining and good quality strength
  • Sewing needle
  • Chalk is helpful, but not necessary
  • Pair of scissors
  • Pants or skirt intended to wear with braces
  • Braces

Supplies for sewing on a brace button


Type of buttons

When selecting a shape for your braces, look for a cone-shaped button. This allows the brace tab to pull the button rather than cause the button thread to cut into the brace tab. You should also look for buttons with 4 holes rather than 2 to provide additional strength. Many tailors suggest that any button is suitable, and while it is true, it won't serve you well when the pressure is on to keep your pants up!


Suspender buttons should be between 1/2" and 5/8" in size to fit in the brace tab. They should be stylish but functional. If the buttons are going to be placed on the outside of your pants, you can be more creative in the design, but keep it tasteful. 


These types of buttons are aptly called 'Suspender Buttons’ at your local sewing store, or you can pick up them up online.


Sewing on a Button

1. Determine button placement

This is the critical step. In fact, there's a full post dedicated to this topic. Essentially, the buttons on the front should be located on a main pleat and then 3-4 inches towards the side. The rear buttons should generally be placed 1.25-1.5 inches on either side of the back center seam. The distance will depend on the distance of your brace tabs and your personal preference. Use the chalk to mark the placement.


You can purchase a pair of suspenders with brace tabs with clips on the ends to experiment with the positioning (see below):


Alternatively, you can temporarily hold the brace tabs to the pants with pins to experiment with the placement.
 

In my case, the popped button is the front, inner button. The button will be sewn in line with the main pleat. It lines up with the pocket line to keep the pant lines taut.


2. Choose whether to sew buttons on the interior or exterior

When every man wore braces in the 19th century and early 20th century, the buttons were located on the outside of the waistband and covered by a vest. As men came back from World War 1, vests started disappearing, which lead to brace buttons moving to the inside of the pants or disappearing altogether. Nowadays, it’s acceptable to place brace buttons on either the interior or exterior - your preference! You may choose to place the buttons on the exterior to display fancy buttons and your personality, or keep them inside and be more reserved. The choice is yours whether to place buttons on the interior or exterior.
 

In my case, as all the other buttons were sewn on the inside, this button will also be sewn on the inside of the waistline. 

3. Sew the first thread

Brace buttons should not lie directly flush on the waistline; there should be a small space allowed by the thread between the button and the pants. This is called the “shank”. Once you’ve inserted the thread into the eye of the needle, insert the needle into the button placement marked by the chalk. 


  • Interior buttons: Make sure that the thread goes through the waistband materials and the lining, but not so far as the exterior of the waistband. This may take some practice. If the thread is only sewn to the waistband and not the inner lining, you will have a roll-over effect and the waistline will pull up but leave the pants hanging. If the thread is sewn through the exterior waistband, it will be visible and look unprofessional. It may be simpler to start with exterior buttons.
  • Exterior buttons: the thread can go through completely as the thread marks will be hidden on the interior of the waistband.
In my case, I’ve selected a thread that matches as close as possible to the color of the exterior waistband. That way I can sew all the way through and show some of the thread. 


4. Knot the thread

Once the needle is inserted, pull the needle through, leaving about 5 inches from the end. Tie a knot with the thread to hold it in place.
 

Here’s a photo of the knot.


 5. Weave the thread

Weave the thread through the button hole, and then back to the waistline, through the button hole in line (not diagonal). The thread should form two parallel lines on the button, rather than an X. This will minimize the friction on the thread during wearing and reduce the changes of the button popping off. 

I recommend weaving the tread 3-4 times through each button hole to attach to the waistline. There should be 4 button holds, so this would be 6-8 loops between the button and the material on the waistline.

Every 3-4 loops through the button, circle around the button and insert the thread through the shank. This will strengthen the attachment.
 

Here’s a photo of the woven thread.


6. Terminate the thread and complete the shank 

Once you complete the weaves through each button hole, finish by having the tread and needle come out of the waistline (not the button). Take the thread and circle around the button 7-8 times. Take the needle and insert it directly into the thread you just circled, leaving a 2 inch loop. Once the needle is through the thread, re-insert the needle through the loop and pull tightly. You can then cut off any excess thread.
 

Here’s a photo of the completed shank.


7. Repeat for remaining buttons

Repeat steps 3-6 for the other 5 buttons.


In my case, I only have 1 button to reattach.


8. Button on the braces

Once the buttons on in place, fit the brace tabs on to the buttons. You are set to enjoy wearing braces! 

I’ve reattached the brace tab to the button. My pants are now be fully supported by the braces.


The view from the exterior.


If you are more of a visual learner, check out Sew Show with Shae episode 73. The only change I'd make is that the placement of the front brace buttons should be above the main pleat (or where the main pleat would be), instead of dividing it into thirds.

Alternatively, Christina at She Sews History. does an excellent job of visualizing how to sew on suspender buttons. She correctly removes the belt loops, puts the buttons in the right placement, and overall is an interesting video to watch about sewing on brace buttons.


Should the belt loops be removed?
Yes. Pants should never be worn with both braces and a belt, so why keep the belt loops? You shouldn’t switch between a belt or braces on the same pair of pants. Additionally, the empty belt loops look out of place when wearing braces. They are not needed and add clutter to the waistband. Cut them off or ask a tailor to remove them.
 

My story
I started sewing on brace buttons onto my pants when I realized that it was too expensive to get a tailor to do it. And most tailors did not know where to put them, how to sew them in without ruining the waistband, and did poor workmanship. So I learned by trial and error.


I learned how to sew buttons into dress pants after many years. I would only wear button-on braces with dress pants. Then one day I remember wearing a pair of jeans with a belt. The bottom cuffs were dragging on the ground and fraying. I started wearing suspenders with the jeans but they didn’t seem to support the pants correctly; the 4 connection points didn’t feel comfortable. 

One day as I reached for the jeans next to dress pants, it dawned on me that I should sew buttons into my jeans to improved the comfort. I sewed on 6 buttons to the inside of the waistband of the jeans and put on a casual pair of braces. The instant I strapped on the braces onto my shoulders it felt right. The jeans were supported on the front crease and side seam, and at the rear. The jeans were a higher rise, and to be worn at the natural waist line. The jeans were made for braces, but I never knew! I’ve been wearing braces with this pair of jeans since then and enjoying the comfort.


Discussion time:

  • Have you sewn on brace buttons or do you go to a tailor?
  • Any helpful tips you’ve discovered when sewing on brace buttons?